Shadowrocket Quick Start Guide
Start with an existing subscription, then add it, choose a mode, connect, and verify access. First establish a working connection, then adjust rules and automatic connection settings.
Before you start: prepare the app and connection details separatelyThis guide uses the iPhone / iPad interface as an example. Install Shadowrocket first: the iPhone / iPad version is available on the App Store for a one-time payment of $2.99; Mac (Apple Silicon and Intel), Windows, Android, and Linux versions are free from the download page. See the installation guide for first-install system prompts. Check the App Store page for the iPhone / iPad system requirements.
Also make sure you have your own subscription link or server details, which you can get from your service provider. This site does not provide, sell, or recommend nodes or subscriptions. A one-time app purchase does not include a service plan. Installing the app does not automatically provide a usable server.
Follow the steps in order. If you have already imported your details, you can start at Global Routing. Screenshots identify interface areas; available fields vary by Type and app interface.
STEP 01 / IMPORT
Add a server / Import a subscription
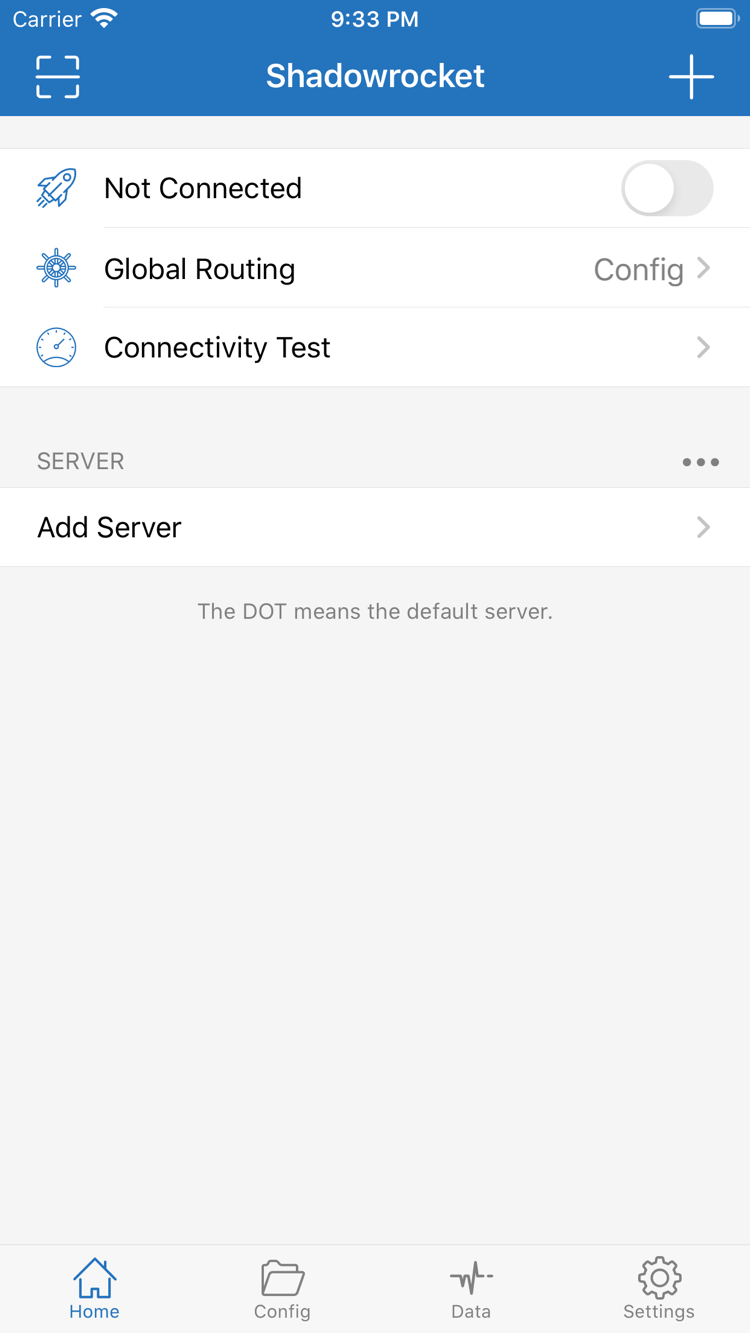
After opening Shadowrocket, stay on Home and do not turn on the switch at the top just yet. The SERVER group near the bottom of the page is where you select a server. If your own entries are not listed, open Add Server. First identify which type of information you have: a subscription link that can update a group of servers, a sharing link for one server, or individual settings to enter manually. These use different entry points, so do not put a link into a field just because it looks similar to another one.
Subscription link: select Subscribe
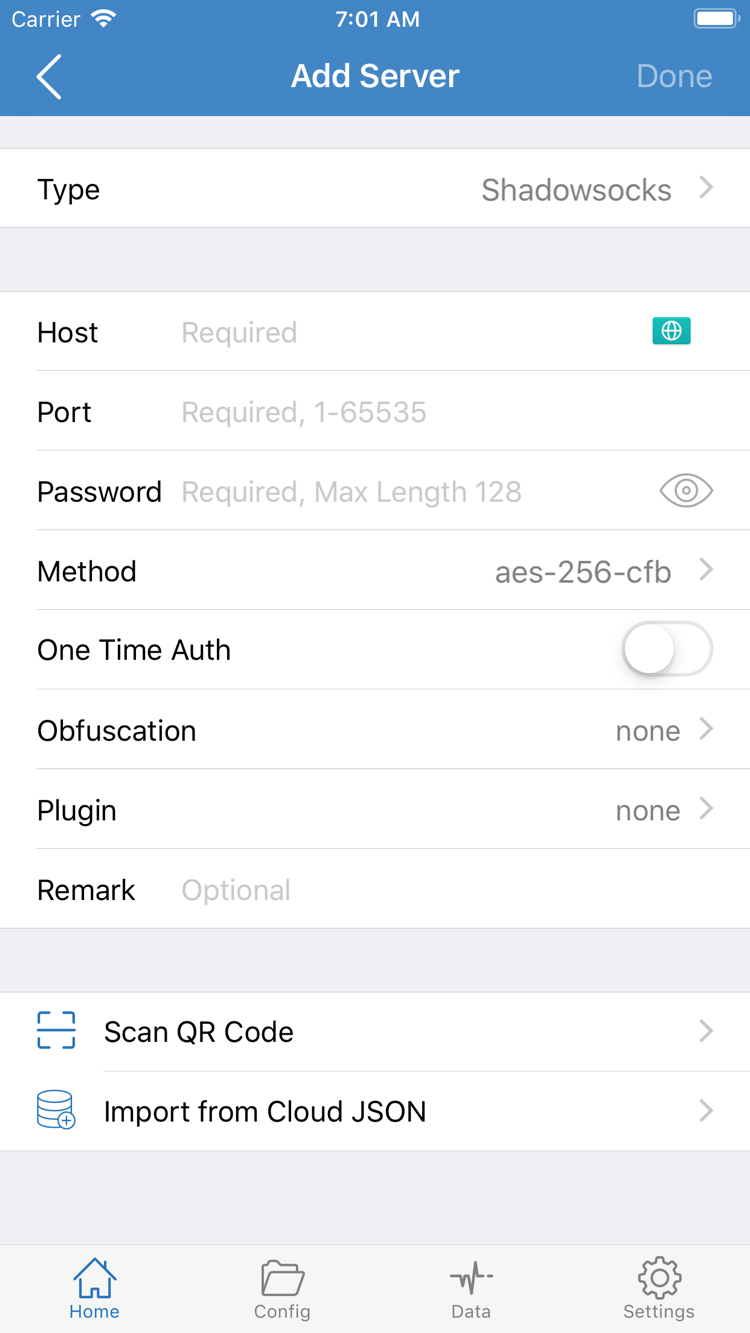
In Add Server, open Type, select Subscribe, then enter the full subscription link in URL. Get the link from your service provider. When pasting it, keep the beginning, path, and query parameters intact; do not include explanatory text from a chat message, line breaks, or trailing punctuation. If the interface has a remarks field, you can enter a name that is easy to recognize, such as “Daily connection.” A remark is only for local identification and will not fix an invalid link.
Save and wait for the subscription to download, then return to Home and check SERVER. A successful import is indicated by the corresponding server entries appearing, not just by a saved subscription record. If you see the subscription name but no servers, first check that your network can reach the subscription address, then confirm that the link has not expired and uses a format supported by your service provider. Do not repeatedly add the same link just to populate the list; duplicate entries make selection and troubleshooting more difficult later.
Individual server settings: enter them for the selected Type
If you received separate fields such as Host, Port, and Password, first select the correct Type in Add Server, then enter the required details. Enter the server domain name or IP address in Host, the corresponding port in Port, and preserve capitalization and symbols in Password. Fill in fields such as Method only when required by that protocol. Do not copy every field from a screenshot of another protocol; check only the fields shown for the selected Type.
For example, Shadowsocks requires a Method that matches the server. For Trojan, check TLS and server name settings against the information you have. If any address, password, or server name is unclear, ask your service provider instead of trying values at random. The screenshot illustrates the structure of Add Server; not every Type uses the same set of fields. After saving, return to SERVER and check the remark and target server. Next, choose how traffic should be routed.
Sharing link or QR code: verify the imported details
If you received a sharing link for one server, you can use the app’s clipboard import option. To use a QR code, open Scan QR Code and allow camera access when prompted by the system. Before importing, confirm that the source and contents are your own server details. After importing, open the entry and check Type, Host, and Port. Import from Cloud JSON is for a specific format; it is not a general input field for arbitrary subscription links.
Subscription links often contain access credentials, and a QR code may contain a full password. Do not post them in public comments or send them in troubleshooting screenshots. For details on updating subscriptions, organizing multiple subscriptions, and sharing link fields, see the subscription and server management guide. For now, keep one set of verified details and continue to the next step.
STEP 02 / ROUTING
Choose a Global Routing mode
Once the server appears, return to Home and open Global Routing. This setting determines how requests are handled; it does not download subscriptions or fill in server details for you. The three modes are Config, Proxy, and Direct. Understand this step before connecting so you do not mistake “a server is selected” for “all requests are going through the server.”
Config: route traffic according to current rules
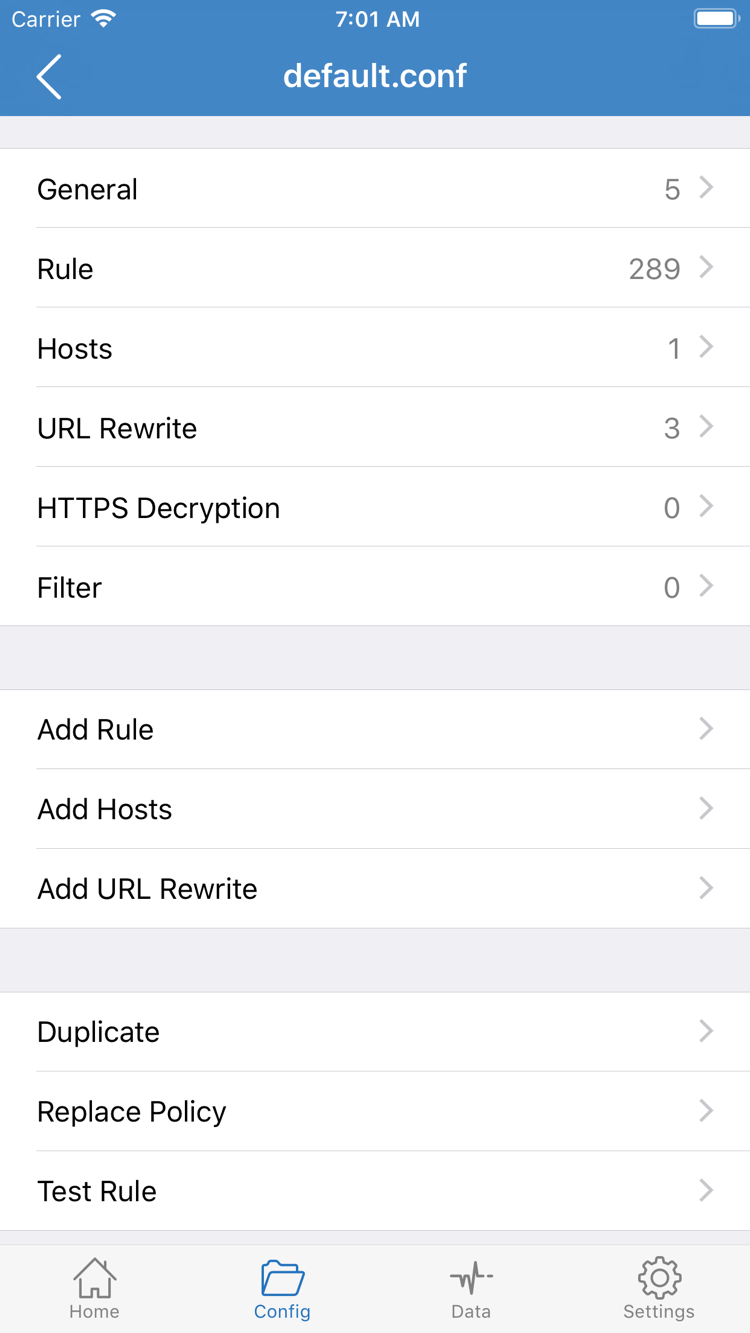
Config uses the rules in the currently selected configuration. Open Config to view, select, and edit configuration files. The General, Rule, and Hosts sections in the editor each have their own purpose; Rule is where you check rule content. Before everyday use, confirm that the intended file is selected, rather than assuming that downloading a file means it is already in use. When getting started, there is no need to change DNS, rewrite rules, and HTTPS Decryption all at once. Begin with basic rules you can understand.
The following is an example of rule syntax, not a recommendation to overwrite your existing configuration. Rules are usually matched in order, and the matching policy determines whether a request goes through PROXY or DIRECT. FINAL handles requests that did not match an earlier rule. If you are not familiar with the current configuration’s source or rule order, check its Rule content first. See the quick reference for specific keywords.
[Rule]
DOMAIN-SUFFIX,example.com,PROXY
GEOIP,CN,DIRECT
FINAL,PROXY
Proxy and Direct: compare traffic paths
Proxy sends requests handled by the app to the selected proxy policy and can help check whether a server is basically working. Direct connects requests handled by the app directly to their destinations. Direct does not turn off the connection switch at the top; the two settings control different things. To disconnect, return to Home and turn off the switch rather than just changing the mode to Direct.
If a page fails to open under Config, briefly switch to Proxy and test the same page. If Proxy works but Config does not, focus on configuration matching, policy selection, and resolution settings. If neither works, continue by checking the server and local network. Change one setting at a time, note the original mode, and restore your usual selection after testing so troubleshooting settings are not left in place.
STEP 03 / CONNECT
Select an entry and turn on the connection
Return to Home and select the server you want to use in the SERVER group. Make sure the selection indicator is on the correct entry. If your subscription contains multiple entries, do not rely only on similar remarks; open the details to confirm the address if needed. Seeing a server in the list only means its details were imported. You still need to grant permission and verify access to confirm that a connection can be established.
Turn on the connection switch at the top of the page. The first time you connect, the system may ask whether Shadowrocket can add a VPN configuration. Read the prompt, confirm that this is the action you just initiated in Shadowrocket, then grant permission and complete device verification as required. This permission is needed for the app to establish a system network connection; it is separate from whether a subscription is valid. If you previously denied permission, start the connection again in the app and check whether the system prompts you to confirm.
After granting permission, return to Home and check whether the status at the top changes from Not Connected to connected. Do not repeatedly toggle the switch while the status is changing; wait for the current operation to finish. If the switch turns off again immediately, note any error message and continue with the troubleshooting steps below. If another system VPN configuration is running, check its status first so you do not mistake its behavior for the result of this test.
For the initial verification, use a manual connection. You can set up On Demand later if needed, but enabling it now adds automatic reconnection conditions and makes it harder to tell whether you have disconnected manually. After completing step four and confirming that access works as expected, read the FAQ guidance on connections and On Demand to decide whether to connect automatically under specific conditions.
STEP 04 / VERIFY
Verify the connection, not just the switch status
With the switch on, run Connectivity Test on Home and check whether the selected entry returns a result. The result only indicates connectivity using that test method; it does not mean every site will work or reflect actual download speed. If a test method does not respond, do not delete the server right away. Check access in a browser as well.
- Check regular access.Open a browser and visit a page that you know is normally available. Confirm that the device can still load content. If regular pages also fail, first check whether your Wi-Fi or cellular network requires sign-in before investigating rules.
- Check a destination expected to use the proxy.Select a destination that you know requires a proxy and that is currently working, then refresh the page and wait for it to load. Regular pages may connect directly under Config, so opening a regular page alone does not prove that the proxy path is working.
- Compare modes if needed.Keep the same server, network, and destination, then briefly switch between Proxy and Config. Change only the mode each time; changing the server and network at the same time makes it difficult to tell what caused the result.
- Restore your usual settings.After testing, return to the mode you plan to use. To disconnect, turn off the switch at the top of Home and confirm the status changes. Do not use Direct as a way to disconnect.
If a browser works but a particular app still fails, check that app’s service status, connection cache, and actual request destination. You can close the current operation in the app and reopen it to test again, but you do not need to reinstall Shadowrocket first. If you see a certificate warning, do not try to “fix” it by enabling HTTPS Decryption; this setting is not needed for the initial connection check.
After this step, you can distinguish three outcomes: “import succeeded,” “system connection established,” and “destination accessible.” When an issue occurs later, identifying which layer failed is more useful than simply saying “it won’t connect.”
STEP 05 / TROUBLESHOOT
Common issues and what to check
When troubleshooting, keep your current configuration instead of clearing the list right away. Check the layers below in order, returning to Home to test after each change. This helps you see whether a change worked and restore the original value if it did not. If the service provider’s details do not match the fields shown, check the Type first instead of putting missing information in a remark or password field.
Subscription saved, but no entries appear under SERVER
Start by checking the subscription download. Confirm that the URL is complete and that you did not put a sharing link for a single server into Subscribe or include spaces and punctuation when copying it. Then check that your local network can complete the subscription request and whether your service provider has changed the link. A failed subscription update does not necessarily make existing entries unusable immediately, so keep any old details you can still identify. See the server management guide for subscription organization and updates.
The switch turns off again or stays disconnected
First check whether you granted permission to add a VPN configuration, then make sure you selected a valid entry on Home. Note the exact message shown by the app and check whether another VPN configuration is currently active on the device. There is no need to repeatedly change Rule settings at this stage: if the system connection itself has not been established, rule changes usually do not explain a permission issue.
Connected, but the test times out or a destination will not open
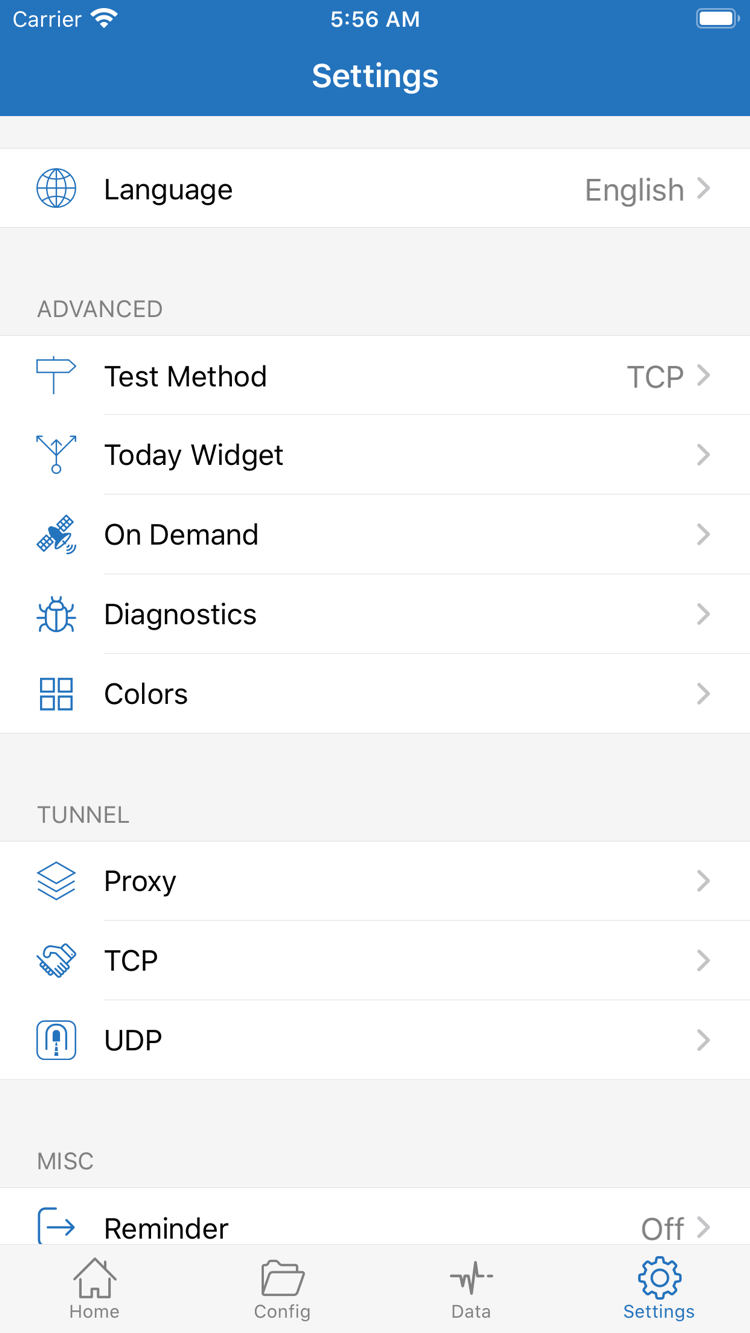
First disconnect and confirm that your local network works on its own, then reconnect and check Host, Port, authentication fields, and TLS-related settings. Connectivity Test results also depend on Test Method. Open Settings to check the current method, then compare it with the browser results. A successful test does not prove that every page will work; if the test does not respond but pages are accessible, check the test method as well.
Proxy works, but Config does not
This result points to the current configuration: check whether the right file is selected in Config, whether Rule matching order is as expected, and whether the destination request is assigned to a different policy. Identify the specific destination and where it is routed before making changes. Do not simply replace every DIRECT with PROXY. See the quick reference for rule keywords and policy meanings. Save more extensive configuration changes until the basic connection is stable.
Keep diagnostic records if needed
Use Diagnostics in Settings to investigate further. Record the network type, Global Routing mode, selected server remark, and what failed. If necessary, capture only the relevant error. Before sharing records, conceal the full subscription URL, Password, QR codes, and other authentication details. Do not share the full server details just to explain an issue. See the FAQ for a longer troubleshooting checklist.
Once import, connection, and real-world access have all been verified, keep these settings as they are. Learn about On Demand, configuration backups, and subscription updates one at a time. Keep a way to return to the previous state with each change, so you can tell whether a later issue is caused by a new setting or a change to the original connection conditions.